
Adding Local Users to Windows Server 2022 Guide
Want to manage user access on Windows Server 2022? This guide walks you through adding local users for secure and controlled access. Whether you’re hosting trading platforms like NinjaTrader or need remote access, local user accounts help you assign roles, limit permissions, and protect your server.
Key Points:
- Why Add Local Users? Control access, reduce risks, and separate admin tasks from daily operations.
- Prerequisites: Ensure admin rights to access tools like Local Users and Groups.
- Methods to Add Users: Use Server Manager for a graphical approach or PowerShell for automation.
- Permissions: Assign users to groups like "Remote Desktop Users" for secure access.
Pro Tip: Always follow the principle of least privilege - grant only the permissions users need to perform their tasks. This ensures better security and stability for your server.
Let’s dive into the details.
Windows Server 2022 Tutorial: Creating Users and Admin Privileges
Prerequisites and Preparations
Local Users vs Domain Users in Windows Server 2022
Before adding local users to Windows Server 2022, there are a few things to double-check. First and foremost, make sure you have administrative privileges on the server. Without these rights, you won’t be able to access the Computer Management console or the Local Users and Groups node, which are essential for creating new users [2][3]. To confirm your access, open Server Manager and check if the "Tools" menu is visible. If it’s there, your account has the necessary permissions [2].
Administrative Access and System Requirements
Administrators have control over system settings, software installations, and file access [4]. You can access the Computer Management utility through Windows Administrative Tools in the Start menu [3]. However, it’s a good idea to limit the number of accounts with administrative privileges. Fewer admin accounts reduce the risk of malware installation or unauthorized changes to the system [4]. For everyday tasks, standard user accounts are a safer option [4].
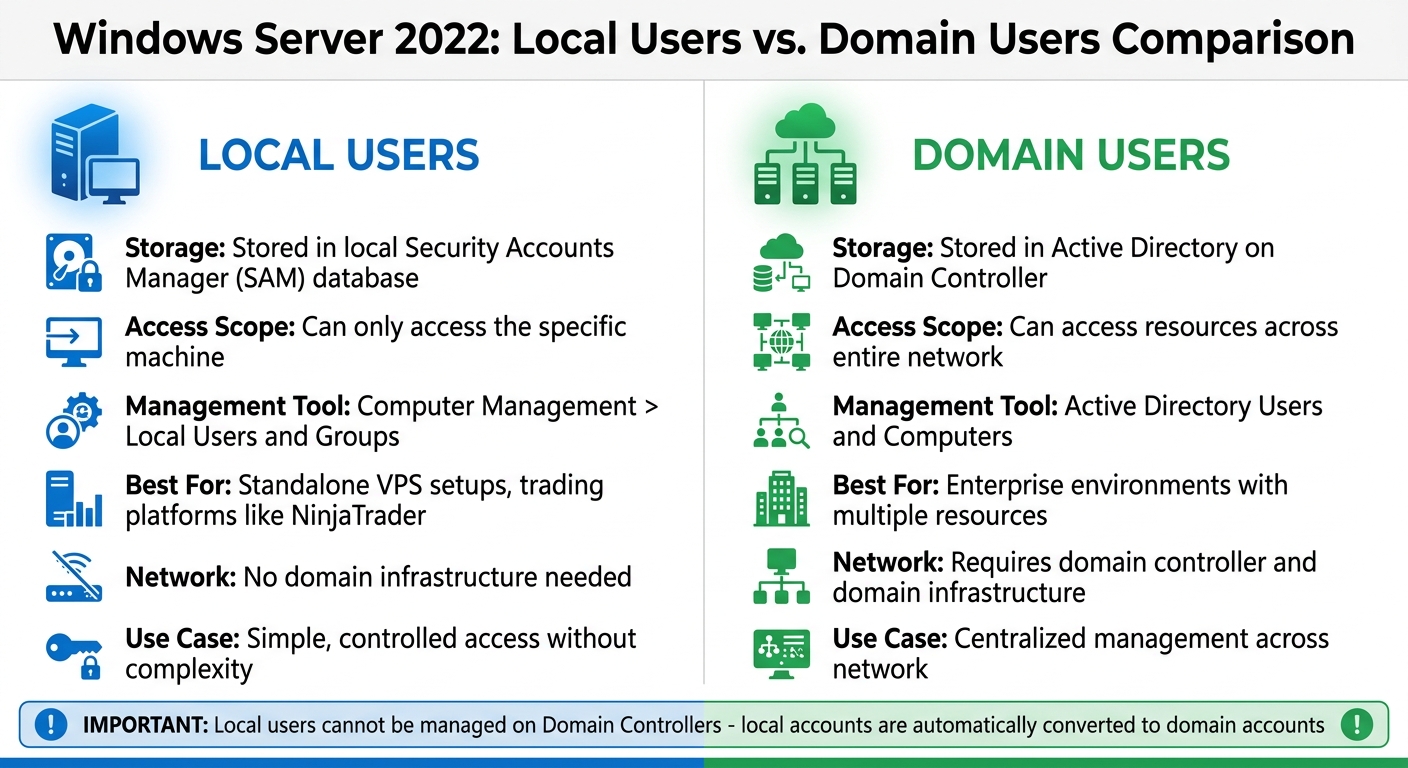
Another key step is verifying whether your server is a Domain Controller. If it is, you won’t be able to use the Local Users and Groups management tool because local accounts are automatically converted into domain accounts [6]. As Daisy Zhou explained, "having 'local' users on a domain controller defeats the purpose of a domain controller" [6]. In this case, user management must be done through Active Directory Users and Computers. This distinction is especially important if you're configuring secure access for trading platforms like NinjaTrader.
Local Users vs. Domain Users: Key Differences
Understanding the difference between local and domain users is crucial for setting up your VPS trading environment. Local users are stored in the server’s local Security Accounts Manager (SAM) database and can only access that specific machine. You can manage these accounts through Computer Management > Local Users and Groups [5][6].
Domain users, on the other hand, are stored in Active Directory on a Domain Controller and can access resources across an entire network [5][6].
For standalone VPS setups running trading platforms like NinjaTrader, local users are usually the better option. They offer the necessary access control without the added complexity of a domain infrastructure. If remote access is required for trading, you’ll need to add these local users to the "Remote Desktop Users" group. Just make sure your server has a stable internet connection with at least 2 Mbps upload and download speeds to ensure smooth remote desktop performance [3].
Continue to the next section to learn how to create local users using Server Manager.
Adding Local Users Through Server Manager
For VPS environments hosting trading platforms on dedicated servers, using the graphical Server Manager offers a simple, secure way to manage local users. This visual method is particularly helpful if you're not comfortable working with command-line tools.
Opening Local Users and Groups
To get started, open Server Manager and go to Tools > Computer Management. From there, expand System Tools and click on Local Users and Groups. You'll see two folders: Users and Groups. Select the Users folder to view all current local accounts.
If you prefer a shortcut, press Win + R, type lusrmgr.msc, and press Enter to open the same window directly.
Once you're in the Local Users and Groups interface, you're ready to create a new user account.
Creating a New User Account
Right-click on the Users folder and choose New User.... A dialog box will pop up with several fields to fill out. The User Name field is mandatory and must be unique on the server since it's the login identifier. You'll also need to set a password in both the Password and Confirm Password fields. Make sure the password meets the system's complexity requirements, which typically include a mix of uppercase and lowercase letters, numbers, and special characters.
For easier identification, you can also add a full name and description, like "John Smith - Trading Platform Access."
Below these fields, you'll find four checkbox options that control how the account functions:
| Password Option | When to Use It |
|---|---|
| User must change password at next logon | Recommended for new users to ensure they set a private password. |
| User cannot change password | Useful for shared accounts or cases where only the administrator manages passwords. |
| Password never expires | Ideal for service accounts or automated tasks that could fail if the password changes. |
| Account is disabled | Handy for pre-creating accounts or temporarily suspending access. |
For most trading VPS setups, it's best to check "User must change password at next logon" to enhance security. Avoid selecting "Password never expires" unless you're setting up a service account, as it can reduce long-term security. Once you've filled out all the necessary information and selected the appropriate options, click Create. If you need to add more users, repeat the process, then click Close when finished.
Verifying User Creation
After creating the account, it should immediately appear in the Users folder. Look for the username you just added to confirm its presence. To double-check the settings, right-click the new user and choose Properties. Under the General tab, ensure the account is active (unless you intentionally disabled it). Then, go to the Member Of tab to see the groups assigned to the user. By default, new accounts are added only to the Users group, which provides standard, non-administrative access.
If the user needs Remote Desktop access for trading activities, you'll need to add them to the Remote Desktop Users group. This step is essential for enabling secure remote access. You can also verify the account using PowerShell by running the Get-LocalUser command, which lists all local accounts and their statuses. Alternatively, use Command Prompt and type net user for a quick overview of all accounts.
These steps ensure that your new user accounts are properly configured and ready for secure use in a trading VPS environment.
Adding Local Users Through PowerShell
For administrators who prefer command-line automation over a graphical interface, PowerShell offers a streamlined way to manage local users. This approach is especially handy in high-security environments like trading systems, where precision and efficiency are critical. PowerShell provides detailed control over account creation and settings.
Using the New-LocalUser Command
The New-LocalUser cmdlet makes creating local user accounts straightforward. Start by opening PowerShell as an administrator. To securely capture a password, use:
$Password = Read-Host -AsSecureString
Next, create a new user with:
New-LocalUser -Name "UserName" -Password $Password
Keep in mind that usernames can be up to 20 characters long but cannot consist solely of periods or spaces. They also cannot include characters like " / \ [ ] : ; | = , + * ? < > @ [7][8]. Passwords, on the other hand, can be up to 127 characters long, allowing for robust and complex credentials [7][8].
You can enhance the account setup by adding optional parameters like -FullName and -Description (limited to 48 characters). For kiosk or service accounts that don’t require passwords, use the -NoPassword switch [7][9]. Once the user is created, the cmdlet returns a LocalUser object containing details about the new account.
After account creation, it’s a good idea to apply password policies to ensure the account remains secure.
Setting Password Policies
Password and account policies can be configured during user creation. For example, use -PasswordNeverExpires for service accounts or -UserMayNotChangePassword to prevent users from altering their passwords [7][8].
For accounts with temporary access needs, such as contractors or short-term projects, set an expiration date by running:
-AccountExpires (Get-Date).AddDays(30)
If the account is meant to be permanent, use the -AccountNeverExpires switch [7][9].
In addition to creating accounts, you may need to remove or modify them when they are no longer required.
Removing Users with PowerShell
To delete an account that’s no longer needed, use:
Remove-LocalUser -Name "UserName"
Before proceeding, verify the username with Get-LocalUser. If you only need to revoke specific permissions without deleting the account, you can remove the user from a group with:
Remove-LocalGroupMember -Group "Administrators" -Member "UserName"
For added safety, include the -Confirm parameter to prompt for confirmation before making changes. Alternatively, use the -WhatIf parameter to preview the command's impact without executing it [10][9].
Setting Permissions and Group Memberships
Once you've created local accounts, the next step is controlling server actions through group memberships. As noted, "Security permissions, such as those to shared folders, are most often assigned to security groups rather than to individual user accounts" [5]. This method streamlines management - when you add a user to a group, they automatically gain all permissions tied to that group.
Adding Users to Built-In Groups
To assign permissions, follow these steps:
- Open Computer Management by running
lusrmgr.msc. - Expand Local Users and Groups and click on Users.
- Right-click the user account, select Properties, and go to the Member Of tab.
- Click Add..., type the group name (e.g., "Remote Desktop Users" or "Administrators"), and click OK.
These settings align with those in the Server Manager, offering a unified approach to permission management across your trading VPS environment.
For those managing multiple servers or seeking automation, PowerShell is a faster option. Use the following command:
Add-LocalGroupMember -Group "Remote Desktop Users" -Member "UserName"
The Remote Desktop Users group enables RDP access without granting full administrative privileges. On the other hand, the Administrators group provides complete system access - use it cautiously and only when absolutely necessary. To check who has elevated access, run:
Get-LocalGroupMember -Group "Administrators"
This command helps you audit group memberships and maintain security.
Understanding Group Membership Effects
Group memberships directly impact access levels established in earlier configurations. Proper setup is especially critical for trading systems. Different groups come with varying levels of permission:
- Administrators: Full server control, including system-wide settings and user rights. Use sparingly to avoid unnecessary risks.
- Users: Standard access, preventing members from making system-wide changes.
- Guest: Highly restricted, temporary access. This group is disabled by default for security reasons.
Always follow the principle of least privilege when assigning group memberships. Only add users to the Administrators group if they need full system access for tasks like maintenance or configuration. In most remote trading setups, combining membership in Remote Desktop Users with the default Users group provides adequate access without compromising security.
"By assigning permissions to a group, all members of that group inherit those permissions. This reduces the administrative overhead of managing permissions for each user individually" [11].
If you need to remove an account, disable it first instead of deleting it outright. This allows time to audit any unique permissions the account holds and transfer them if necessary, ensuring no critical processes are disrupted.
Best Practices for Managing Local Users
Once you've set up user accounts, the work doesn't stop there. Ongoing management is crucial to ensure security and maintain smooth operations on your VPS. Simply creating accounts isn't enough - regular oversight is key to keeping your trading environment secure.
Enforcing Strong Password Policies
To enforce strong password policies, head to the Local Group Policy Editor at Computer Configuration\Windows Settings\Security Settings\Account Policies\Password Policy. Here’s what to do:
- Enable "Passwords must meet complexity requirements" and set a minimum password length of 8 characters.
-
Use the following command to apply this policy across all accounts:
net accounts /minpwlen:8 - Configure "Enforce password history" to prevent users from reusing old passwords.
- Set a "Maximum password age" to require periodic password updates, and a "Minimum password age" to stop users from quickly reverting to previous passwords.
- Unless absolutely necessary for legacy applications, disable "Store passwords using reversible encryption". This option essentially stores passwords in plain text, which is a major security risk.
Auditing User Accounts Regularly
Regular audits are a must to identify potential vulnerabilities. Use the Get-LocalUser command to review all accounts and export the list for analysis. Pay special attention to accounts marked as "Password never expires", as these can create security gaps.
For environments where access control is critical, restrict login times by using the /times parameter with the net user command. This reduces the risk of unauthorized access during off-hours. Routine audits help ensure that your user records remain accurate and up-to-date.
Documenting User Account Changes
Good documentation is the backbone of effective account management. Always use the Description field when creating or updating accounts to clarify the user's role or the account’s purpose.
Before deleting any account, confirm it isn’t tied to essential background services - this helps avoid unintended service disruptions. As a safeguard, consider disabling the account temporarily before permanently removing it. This allows you to confirm that it’s no longer needed.
Finally, run regular exports using the Get-LocalUser command to maintain an updated record of your server's user configurations. This ensures you have a clear picture of all active accounts and their roles, supporting both security audits and smooth operations.
Conclusion
Managing local users effectively, whether through Server Manager or PowerShell, is essential for maintaining controlled access and ensuring smooth trading operations. Windows Server 2022 simplifies this process with its built-in tools, allowing precise control over user permissions. A key strategy here is adhering to the least privilege principle - assigning only the permissions absolutely necessary. In trading environments, this means placing users in groups like "Remote Desktop Users" instead of granting full administrative rights. This reduces the chances of accidental changes that could disrupt critical operations, such as those involving NinjaTrader.
To bolster security, enforce strong password policies. Avoid enabling "Password never expires", as this increases vulnerability, and use the "User must change password at next logon" option when creating accounts for third-party users. Microsoft Support underscores the importance of restricting administrative access:
"You should limit the number of administrators on your Windows device because administrators have complete control over the system... If too many people have this level of access, it could lead to security risks like malware installation or unwanted changes to your system." [4]
This advice is particularly relevant in algorithmic trading setups, where even minor disruptions can impact performance.
Another important practice is to disable accounts before deletion. This minimizes the risk of unintended service interruptions. As Microsoft Learn advises:
"The best practice is to disable accounts before deleting them in case the account has permissions to resources that can't be accessed via other methods." [5]
Conduct regular audits using Get-LocalUser and maintain clear documentation to ensure thorough access control. These steps are vital for safeguarding the stability and security of trading environments.
Keep in mind that local user management is unavailable if your server is promoted to a Domain Controller, as local accounts are moved to Active Directory [1][12]. For VPS setups, such as those on TraderVPS, keeping your server as a member server or workgroup server allows you to retain full control over local user management. This flexibility is crucial for maintaining the precise access levels needed to keep your trading infrastructure secure and efficient.
FAQs
What if my server is a Domain Controller?
When your server functions as a Domain Controller, user accounts aren't handled like they are on standalone servers. Instead, they're managed through Active Directory Users and Computers. This tool centralizes user management for the entire domain.
To manage domain user accounts, you'll need specific permissions - usually held by Domain Admins or Enterprise Admins. Here's how you can add a user:
- Open Active Directory Users and Computers.
- Expand the domain and navigate to the desired organizational unit (OU).
- Create the user account within that OU.
This process is distinct from managing local accounts on servers that aren't part of a domain or are in non-domain environments. The centralized approach simplifies user management across large networks.
Why can’t a local user log in via RDP?
If a local user is unable to log in via Remote Desktop Protocol (RDP) on Windows Server 2022, it’s often due to missing permissions for remote access. Here’s how you can address this issue:
- Check Group Membership: Ensure the user is added to the appropriate group, like the "Remote Desktop Users" group, which grants RDP access. You can manage this through the Local Users and Groups tool.
- User Rights Assignment: Review the server's security policies under "User Rights Assignment" to confirm the user has the "Allow log on through Remote Desktop Services" permission.
- Verify Remote Desktop Settings: Make sure Remote Desktop is enabled on the server. Double-check the configuration to ensure it allows connections and is set up to accept the appropriate user accounts.
By ensuring these settings are in place, you can resolve most RDP login issues for local users.
When should I disable vs delete a user?
To temporarily restrict access without removing a user account, you can disable the account. This is useful for situations like maintenance periods or when the user is on leave. The account's data and settings remain intact, making it simple to reactivate later.
If the account is no longer needed, such as when a user has left the organization, you should delete the account. This action permanently removes the account and its data, helping to improve security and reduce unnecessary clutter.


